In the world of networking and web infrastructure, proxies play a crucial role in managing traffic, enhancing security, and improving performance. Nginx, one of the most popular web servers and reverse proxy solutions, offers capabilities at both Layer 4 and Layer 7 of the OSI model. Understanding the differences between these two proxy types is essential for architects and engineers looking to design robust, scalable, and secure systems.
Table of Contents
Understanding the OSI Model Layers
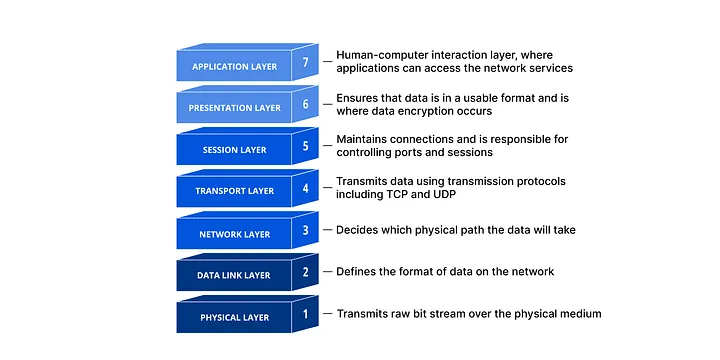
Layer 4 — Transport Layer
The Transport Layer is responsible for end-to-end device communication, ensuring data transfer reliability, flow control, and error recovery. The two main protocols at this layer are:
- TCP (Transmission Control Protocol): Connection-oriented, reliable data delivery
- UDP (User Datagram Protocol): Connectionless, faster but less reliable
The Transport Layer handles the end-to-end communication between devices, ensuring that data is delivered reliably and in the correct order. It’s responsible for:
- Flow control
- Error recovery
- Connection establishment and termination
- Port addressing
Layer 7 — Application Layer
The Application Layer is the closest to the end user, providing network services directly to applications. It deals with application-specific protocols such as:
- HTTP/HTTPS
- FTP
- SMTP
- WebSockets
- DNS
Layer 7 Protocols are built on top of Layer 4, making it possible for stateful protocols like TCP to support stateless protocols like HTTP. This layer is responsible for:
- Application-specific protocols
- Data formatting
- User interface
- Application services
- Network services
Nginx as a Layer 4 Proxy
A Layer 4 proxy, also known as a transport-level proxy, operates at the transport layer of the OSI model. It forwards network packets based on information available in the TCP/UDP headers, primarily IP addresses and port numbers.
Layer 4 proxying is particularly useful for database load balancing, as databases use their own protocol based on TCP protocol to communicate, not HTTP.
Key Features
Layer 4 proxying offers several distinctive characteristics:
- Protocol-Agnostic: Works with any protocol (HTTP, WebSockets, etc.)
- Simple Routing: Based solely on IP address and port
- Lower Overhead: Less processing required per connection
- No Content Inspection: Cannot read or modify the content of packets
- Connection Persistence: Maintains the same backend server for a client’s connection
- No URL Endpoint Awareness: Cannot route based on URL paths or query parameters
You can compare Layer 4 proxy to a tunnel, as it simply forwards packets without examining their contents.
Setting up Nginx with Docker
Here’s a basic example of setting up Nginx with Docker:
# nginx.conf
http {
    server {
        listen 80;
        location / {
            return 200 "hello world";
        }
    }
}

events {}
To run the Nginx container:
docker run --hostname nginx -p 8080:80 -v ./nginx.conf:/etc/nginx/nginx.conf --name nginx -d nginx
To confirm it’s working:
curl localhost:8080
# Output: hello world
Practical Implementation
TCP Proxy Example
Let’s create a simple TCP server with Python first:
import socket
import json
import datetime
import platform
import threading

PORT = 3000

def handle_client(client_socket, addr):
    print(f"connected to {addr}")

    try:
        while True:
            data = client_socket.recv(1024)
            if not data:
                break

            print(f"received data from {addr}: {data.decode('utf-8')}")

            response = {
                "message": "hello from server",
                "hostname": platform.node(),
                "timestamp": datetime.datetime.now().isoformat(),
            }

            client_socket.sendall((json.dumps(response) + "\n").encode("utf-8"))
    except Exception as e:
        print(f"error handling client {addr}: {e}")
    finally:
        client_socket.close()
        print(f"connection closed for {addr}")

def main():
    server = socket.socket(socket.AF_INET, socket.SOCK_STREAM)
    server.setsockopt(socket.SOL_SOCKET, socket.SO_REUSEADDR, 1)

    server.bind(("0.0.0.0", PORT))
    server.listen(5)
    print(f"TCP server is running on port {PORT}")

    try:
        while True:
            client_socket, addr = server.accept()
            client_handler = threading.Thread(
                target=handle_client, args=(client_socket, addr)
            )
            client_handler.daemon = True
            client_handler.start()
    except KeyboardInterrupt:
        print("Server shutting down...")
    finally:
        server.close()

if __name__ == "__main__":
    main()
Create a Dockerfile for the TCP server:
FROM python:3.11-alpine

ENV PYTHONUNBUFFERED=1

WORKDIR /app

COPY tcp-server.py .

CMD ["python", "tcp-server.py"]
Run three TCP containers:
docker build -t tcp-server -f tcpDockerfile .
docker run --rm -p 3000:3000 --name tcp-server1 --network backend --hostname tcp1 -d tcp-server
docker run --rm -p 3001:3000 --name tcp-server2 --network backend --hostname tcp2 -d tcp-server
docker run --rm -p 3002:3000 --name tcp-server3 --network backend --hostname tcp3 -d tcp-server
Now, let’s set up the Nginx Layer 4 proxy:
include /etc/nginx/modules-enabled/*.conf;

events {}

stream {
    upstream tcp_backend {
        server tcp-server1:3000;
        server tcp-server2:3000;
        server tcp-server3:3000;
    }

    server {
        listen 4000;
        proxy_pass tcp_backend;
    }
}
Run the Nginx container:
docker run --rm --name nginx -p 8080:4000 -v ./nginx.conf:/etc/nginx/nginx.conf --network backend nginx
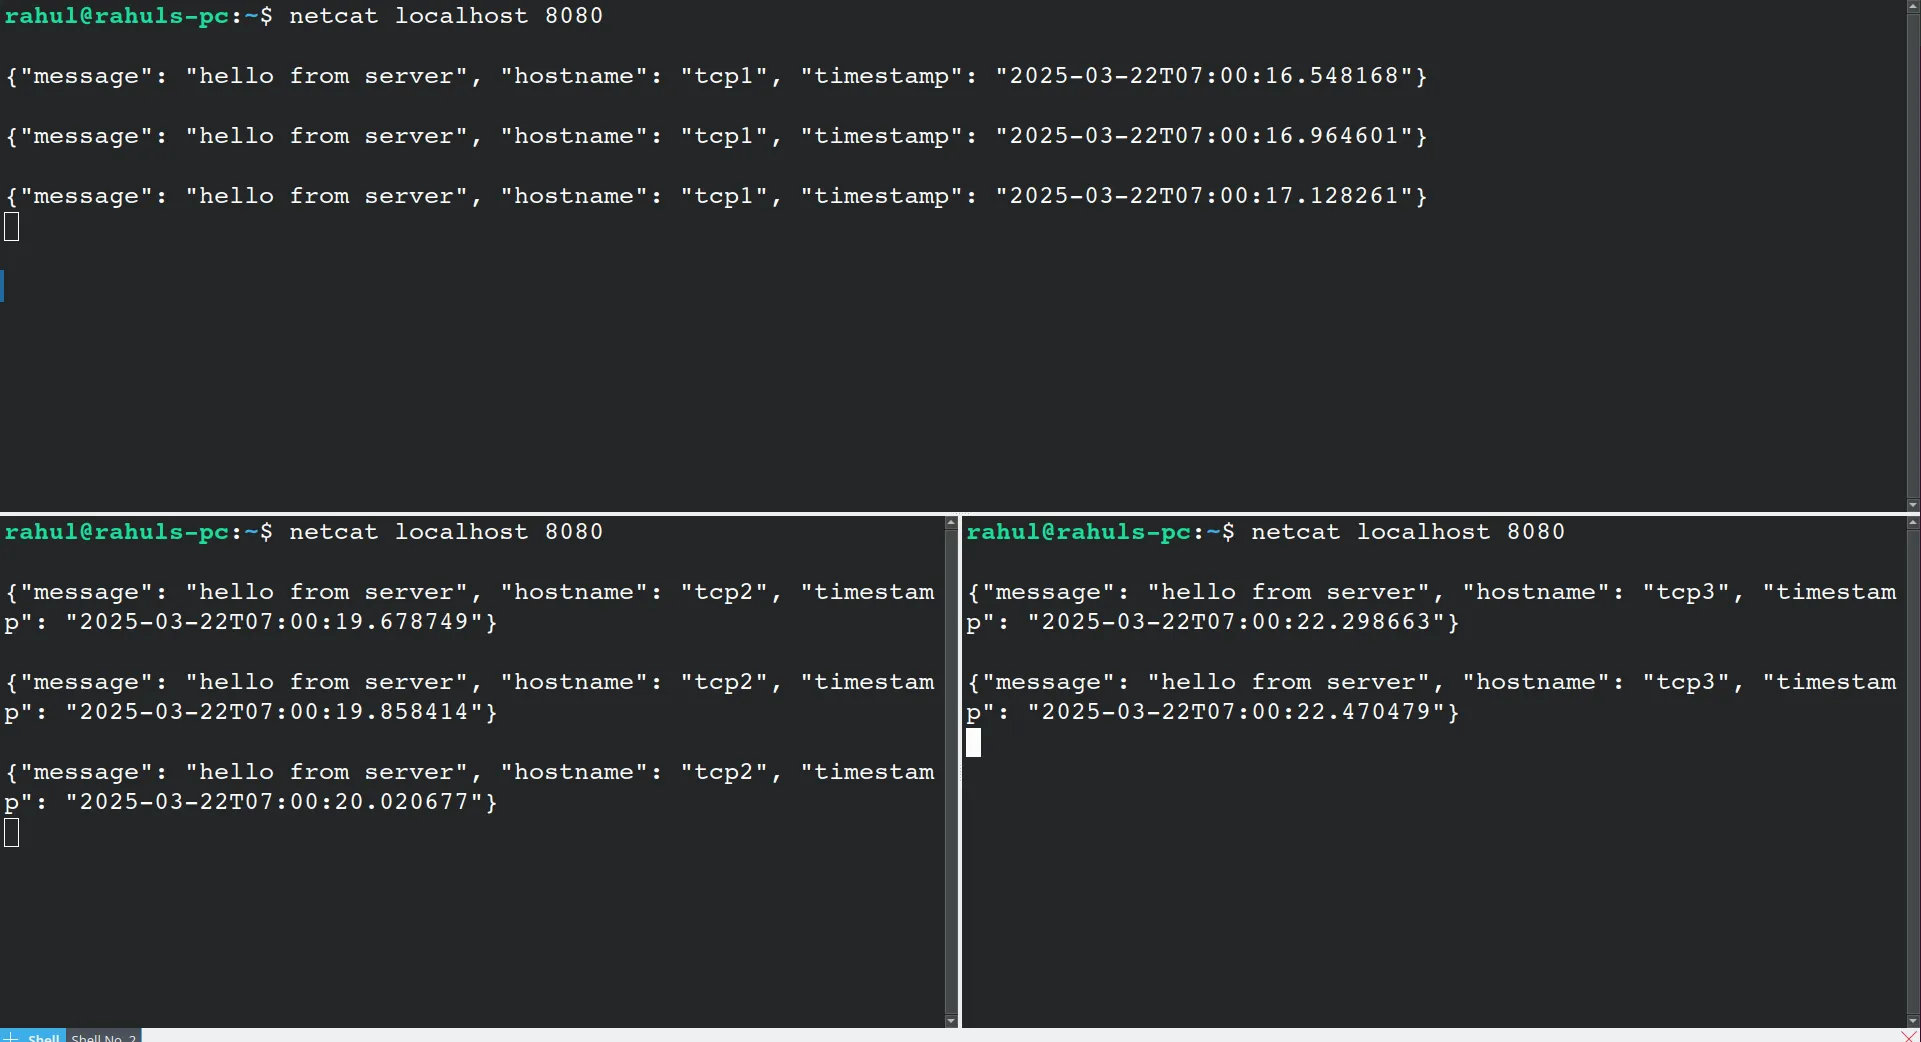
TCP is connection-oriented, so once a connection is established, Nginx will tunnel all messages in that connection to the same server.
UDP Proxy Example
Let’s create a UDP server:
import socket
import datetime
import json
import platform

def main():
    server = socket.socket(socket.AF_INET, socket.SOCK_DGRAM)
    port = 4000
    server.bind(("0.0.0.0", port))

    try:
        while True:
            message, client_address = server.recvfrom(1024)
            print(f"received message from {client_address}: {message.decode('utf-8')}")

            response = {
                "message": "hello from udp server",
                "hostname": platform.node(),
                "timestamp": datetime.datetime.now().isoformat(),
            }

            server.sendto(json.dumps(response).encode("utf-8"), client_address)
    except KeyboardInterrupt:
        print("UDP server shutting down...")
    finally:
        server.close()

if __name__ == "__main__":
    main()
There are no listen and accept calls in UDP because it does not perform a three-way handshake like TCP. As a result, concepts such as the accept queue and backlog do not apply to UDP.
Create a Dockerfile for the UDP server:
FROM python:3.11-alpine

ENV PYTHONUNBUFFERED=1

WORKDIR /app

COPY udp-server.py .

CMD ["python", "udp-server.py"]
Configure Nginx for UDP:
include /etc/nginx/modules-enabled/*.conf;

events {}

stream {
    upstream udp_backend {
        server udp-server1:4000;
        server udp-server2:4000;
        server udp-server3:4000;
    }

    server {
        listen 4000 udp;
        proxy_pass udp_backend;
    }
}
You can use nc to test the UDP server:
echo "Hello from client" | nc -u localhost 4000
Advantages and Limitations
Layer 4 proxying offers several benefits:
- Performance: Lower processing overhead leads to higher throughput
- Protocol Support: Works with any TCP/UDP protocol
- Simplicity: Easier to configure and troubleshoot
- Encryption Handling: Can proxy encrypted traffic without decryption
- Lower Latency: Minimal packet inspection means faster forwarding
However, it also has limitations:
- No Content Awareness: Cannot make routing decisions based on HTTP headers or content
- Limited Load Balancing: Cannot distribute traffic based on request content
- No SSL Termination: Cannot terminate SSL/TLS connections
- No Content Modification: Cannot modify requests or responses
- No URL-Based Routing: Cannot route based on URL paths or query parameters
When to Use Layer 4 Proxying
Layer 4 proxying is particularly suitable when:
- Performance is Critical: You need maximum throughput with minimal latency
- Protocol Diversity: You’re handling non-HTTP protocols (SMTP, FTP, custom protocols)
- Simple Load Balancing: You only need a basic distribution of connections
- End-to-End Encryption: You need to maintain encryption throughout the path
- Minimal Resource Usage: You want to minimize proxy server resource consumption
- UDP Traffic: You need to handle UDP-based protocols like DNS or VoIP
- Database Traffic: You’re load-balancing database connections
For database load balancing, you might want to use hash-based load balancing to ensure the same client always connects to the same server:
upstream postgres_servers {
    server db1.example.com:5432;
    server db2.example.com:5432;
    # Hash-based load balancing to ensure the same client always connects to the same server
    hash $remote_addr;
}

server {
    listen 5432;
    proxy_pass postgres_servers;
    # Longer timeout for database connections
    proxy_timeout 600s;
}
Conclusion
Layer 4 proxying with Nginx provides a powerful and efficient solution for handling network traffic at the transport layer. While it may not offer the content-aware features of Layer 7 proxying, its simplicity, performance, and protocol flexibility make it an excellent choice for many use cases, particularly when dealing with non-HTTP protocols or when maximum throughput is required.
Understanding when to use Layer 4 vs. Layer 7 proxying is crucial for building efficient and scalable network infrastructures. Layer 4 proxying excels in scenarios where protocol-agnostic, high-performance forwarding is needed, while Layer 7 proxying is better suited for content-aware routing and application-specific optimizations.
Next time, we’ll explore how to load balance or proxy WebSockets with both HAProxy and Nginx, as HAProxy supports WebSocket-aware traffic.